As an applications engineer, I’m often asked by customers to
give advice on how to test designs using SOLIDWORKS. One of the most recent
examples that demonstrates how quick and easy SOLIDWORKS makes this process related
to testing how effective a layer of insulating material for an oven was.
The customer designs and manufactures insulation components
to be used in industrial ovens and wanted to assess how effective those
components were ate shielding the outer surfaces of the oven from the
temperatures achieved within.
SOLIDWORKS Simulation Professional gives you the ability to
run a Thermal analysis which can be carried out under a large range of
conditions and on complex model geometry. But without the lengthy operation of
setting up and running an analysis on a complex fully accurate model, here’s a
tip on running that all important first test to see if the components and the
material properties meet some basic criteria.

Firstly, simplify the study by only including what you have
to for the moment.
I have done this by only including what I am interested in
with regards to heat transferring from the inside of the oven to the outside
face. This leaves me with as sandwich of materials representing the internal
wall of the oven, the layer of insulating material and then the outside skin of
the oven.
By reducing the information that you are including in any
simulation study, you will in turn reduce the complexity of the study and therefore
the time taken to mesh and run the study. Also, with less geometry to consider,
the mesh used to describe your study can be made from smaller elements.
The next step after generating a suitable model for your
study is to create the study (or mathematical model) itself.

If you haven’t already, make sure that your SOLIDWORKS
Simulation add-in is turned on by going to Tools – Add-ins.
SOLIDWORKS Simulation is fully integrated into the user
interface enabling you to dynamically move between modelling and simulation
without skipping a beat.

On the Simulation tab on the command manager simply choose
to create a new study and select the type of study that you would like to
perform. Depending on the level of Simulation package that you have, only the study types available to you will be shown
at this point. For this example, I would like to perform a Thermal study.

A study tree is generated in the feature tree / property
manager area of the user interface and this allows you to keep track of and
modify your study. To speed things up even further, most functionality for
controlling and running your study can now be accessed by right-clicking the
relevant item in the study tree.

All of my materials have been transferred over from my
SOLIDWORKS model including the customer material properties that I have added
for my insulation material. Also because my basic layers of material are all
coincident, they will automatically have a bonded connection defined in the
study.
For this particular study, I would like to test the oven
when it is running at a temperature of 210 degrees Celsius over the period of
an hour and it will probably take a few minutes to heat up. SOLIDWORKS
Simulation Professional gives you the option to change the properties of the
study to make it transient and to specify both the overall time and the
increments to be tested by right clicking the study and choosing properties.

I've chosen to run the study for 3600 seconds at 60 second
increments.
Now what I need to do is apply the variables to my study. By
right-clicking the Thermal Loads section of the study tree, I get the options
to add Temperature, Convection, Heat Flux & Power, or Radiation values.

To start, I would like to define what temperature the
components are at the moment. To do this, I’ll create a temperature load as an
initial value for all solid bodies of 25 degrees Celsius.

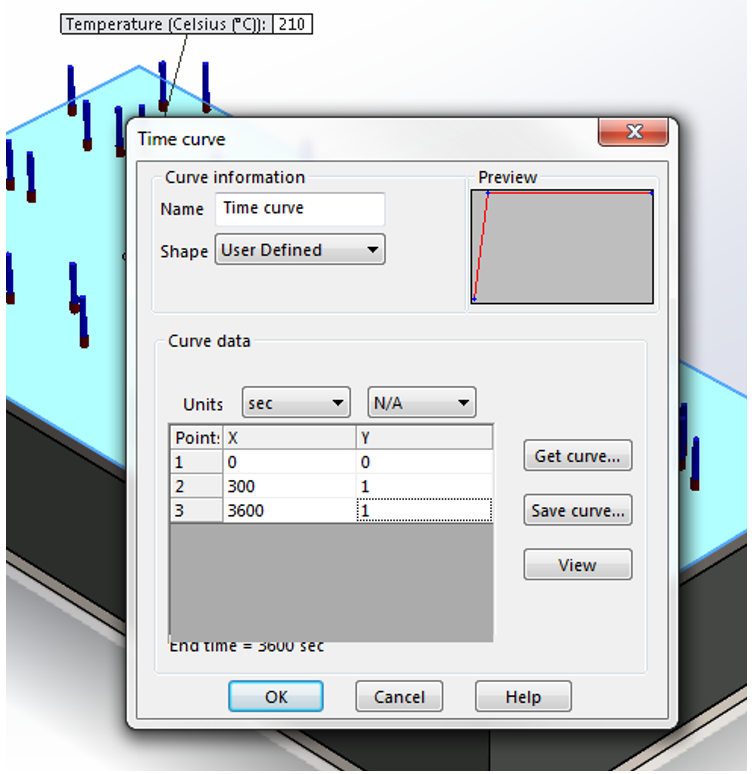
Here I can set the time that the temperature source takes to
reach particular values. I’ll set this to reach full temperature at 300 seconds
(5 minutes).
One last thing before I run the study, I’ll specify that the
outer face of the oven is subject to convection into the surrounding
atmosphere. This is applied as a Thermal Load onto the outside face.

I’ll select the correct face and then add my Convection
Coefficient and Bulk Ambient Temperature. A Coefficient of 5-25 W/m^2.K will
represent natural convection into the surrounding atmosphere (i.e. no
assistance). So a value of 20 should represent a well-ventilated area. You can
also switch unit settings if it is easier for you, but 298.15 Kelvin works out
at 25 degrees Celsius.
At this point you can specify any mesh size that you would
like. But for this study I will simply use the default mesh size that
SOLIDWORKS Simulation generates based upon the physical geometry. To save
myself a couple of clicks, I can use the default mesh and run the study at the
same time by right clicking the top of the study tree and selecting Run.

Due to the simplified model geometry and using lightning
fast solvers, this study takes no time at all to solve.

I can analyse these results using a range of tools including Probe which is accessed through right-clicking the result plot. This enables me to analyse the results on just the face representing the outside of the oven and I can see that the temperature is reasonably low compared to the inside of the oven and I can check this information against my design requirements.